Overview
Background Scroll Effects installs into Dreamweaver, giving you access to a fully automated interface in which you can choreograph intricate animation sequences. Animations can be bound to the page scroll/swipe or can be triggered when scrolled to.
BSE animations are either bound to page scrolling/swiping or triggered by it.
If you have not already viewed the demos, please do so now. We'll meet you back here.
BSE Asset Folder
When you create a BSE animation, the system will automatically create the asset files and folders necessary, and link them to your page. The main asset folder is called p7bse.
When publishing your site, make sure to upload the entire p7bse folder.

Installing Background Scroller Effects
Extension installer files come in 2 formats: MXP and ZXP. MXPs are supported by Extension Manager versions MX, MX2004, 8, CS3, CS4, CS5, CS5.5 and CS6. ZXP is supported by versions CS5.5 and higher, including Creative Cloud versions. To install, open the relevant Extension Manager, click the Install icon or link, and then browse to where you unzipped the installer file.
Relevant Extension Managers
For Dreamweaver MX, MX 2004, CS3, CS4, CS5, CS5.5, and CS6, use the Macromedia or Adobe Extension Manager that automatically installed with Dreamweaver.
For Creative Cloud versions, use the free Extension Manager for Adobe Creative Cloud:
Extension Manager for Adobe CC
( Windows and Mac)
Accessing the BSE UI
There are 3 ways to access the UI. Choose the one most suitable to your workflow. When you open the interface, the system will detect the appropriate mode (Insert or Modify) based on the element your cursor is within.
Note: There is never a need to use the vestigial Modify menu in older versions of Dreamweaver.
UI Opening Methods
1. Insert Bar
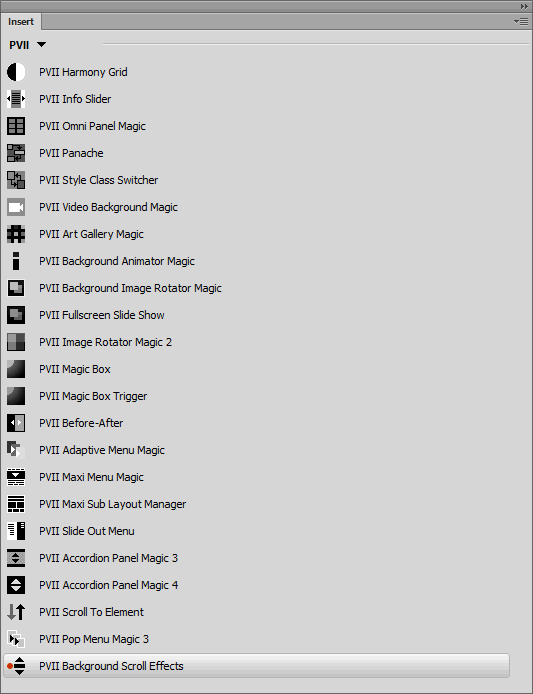
Switch to the PVII category. The icon should be the last on on the bar.
![]()
2. Insert Panel
Switch to the PVII category.

3. Insert Menu
Choose Insert > Studio VII > Background Scroller Effects by PVII
Selecting Elements to be Animated
With BSE, you're going to be working with elements that are already on your page—elements such as headings, paragraphs, and (most often) DIVs. BSE is either bound to, or triggered by, the act of scrolling the page. Bear that in mind when choosing elements to animate. Elements that are at the top of your page, for instance, will not work the same as those that are partway down, or below the fold.
How to Select
Place your cursor inside the element you wish to assign a BSE animation to and open the BSE UI. Let's say your cursor is inside this paragraph. This paragraph is inside a Harmony hmy-content DIV, which is inside a Harmony hmy-content-wrapper DIV, which is inside a Harmony hmy-section DIV, which is inside a Harmony root p7HMY DIV, which is a direct child of the body.
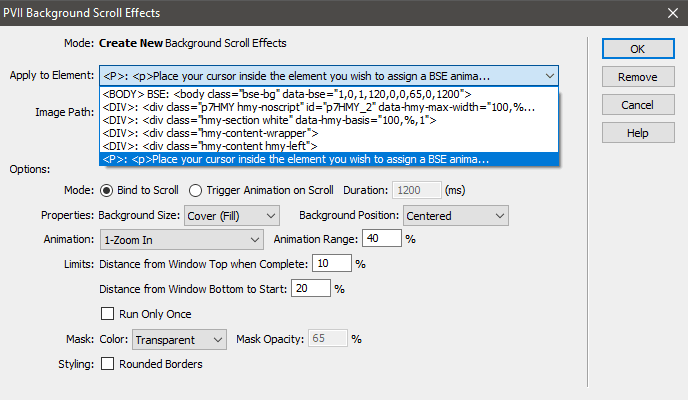
When you open the UI and look inside the Apply to Element list, you will see the hierarchy of tags:

Each tag up the hierarchy from the paragraph my cursor was inside of, up through the body (which already has a BSE instance assigned) will be listed. Each element listing contains the first 72 charactersof the element's tag, making it easier for you to identify.
Note: The Apply to Element list contains all of the direct parents of the element your cursor was in when you opened the UI. Use this list to make sure you are assigning your BSE animation to the correct element.
Things to Consider
When you plan your animations, there are a few things to keep in mind...
Since BSE animates background images, you need to ensure that the element you are assigning the effect to is tall enough to display your image. The height of an element is, of course, determined by the content inside, but do keep in mind that you can use CSS to assign either top/bottom padding or a min-height to your element to establish a rendered height. We'll discuss this more in the next major section (Design Strategies and Tips).
Harmony and Layout Builder Considerations
If you're a PVII customer, chances are good that you are using our state of the art CSS page layout tools: Harmony or Layout Builder. Background Scroll Effects will work perfectly in pages made with either tool.
To animate a background in a Harmony column so that the entire column is filled, choose an hmy-content-wrapper DIV. For Layout Builder, choose an lbm-row DIV to fill an entire row, or an lbm-col-wrapper DIV to fill a single column.
Design Strategies and Tips
When it comes to background images, size is important, and aspect ratio is very important. Modern computer screens typically use an HD aspect ratio of 16:9. Most mobile devices use 4:3 aspect ratio (similar to older computer monitors). Some newer, oversized mobile devices use 12:9 or even 16:9. It's a jungle out there. Before you throw up your hands, understand that 16:9 images, when scaled to fit mobile viewports, look just fine, especially when considering that mobile devices can be turned from portrait to landscape orientation when needed. So, your first criteria in choosing or making images is to fit them to the approximate shape of your page. For a sidebar, use a portrait image when possible. For a full screen row, use a landscape image. Keep this in mind, and you'll get the best results.
Oversizing
You've got a sidebar on your page. And since this is not 1999, that sidebar is very likely adaptive. In a full-screen browser, your sidebar might render at a width of 450 pixels. Make your window narrow, and the sidebar could shrink to 300 pixels. Pass your layout's breakpoint and your columns might linearize, making your sidebar and your main column both 768 pixels wide. Criminy! What to do?
Let your Responsive Breakpoint be Your Guide
If your page linearizes at 768 pixels, make your portrait images equal to or greater than that width, if you want them to fill the box. Make your landscape images at least as wide as their containing element as it renders in a full-screen browser at a resolution of 1920 x 1080. Adjust to suit your tastes and goals. For instance, a high quality image with a natural width of 1600 pixels, might scale nicely to 1920 pixels wide. It's up to you.
Rendered Height
There might be times when you want to assign a background to an element that has very little content. The element might have a single line of text and a rendered height of perhaps 100 pixels. A background image is not going to have enough room to display. Here is where CSS comes to the rescue. Let's say you are wanting to place a BSE background on a paragraph that simply says Hello World. Let's try it. Here's the paragraph:
Hello World!
Not much room to display a background image, is there?
Let's assign a class of make-tall and write a relevant CSS rule. Here's the code:
<p class="make-tall">Hello World!</p>
And here's the CSS:
.make-tall {

          padding: 25% 0;

          text-align: center;

          border: 1px solid;

          }
And here's the finished paragraph:
Hello World!
Now it's tall enough to present a nice BSE background image.
Note: You can also do a blank box using this technique. And if you need precision, you can also set a min-height instead of top/bottom padding.
Just because we thought it would look cool...
We added a BSE instance to this Harmony row.
Interface Options and Settings

Mode
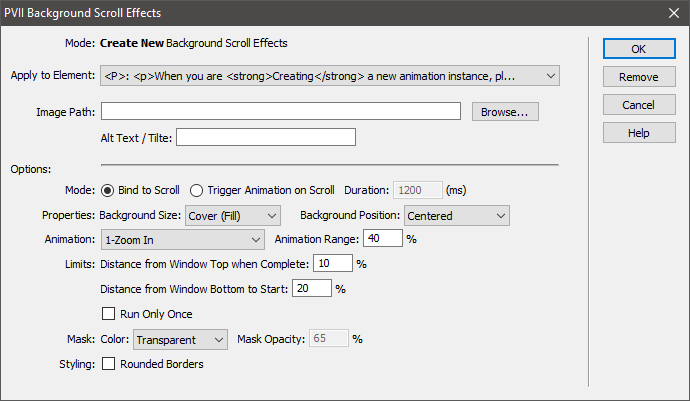
When you open the UI, the system will detect your cursor position and the element it is inside of. The Apply to Element list will reflect the selection, which will determine whether the UI is in Modify or Create mode. You can then change the selection in the list to whatever element you wish to work with.
Note: The Apply to Element list contains all of the direct parents of the element your cursor was in when you opened the UI. The UI tries to preselect the item it thinks you want, but do use the list to ensure the element you wish to animate is the one selected.
Image Path
Use the Browse button to locate and set the path to your background image.
Alt Text/Title
The background images you set in each BSE instance on your page, are placed in your page code - near the bottom. This code never appears on your rendered page, but serves to allow search engines to locate and index your background images. The Alt/Title information can be used to describe your image in a few words. By default, it will contain the file name of the image. You can change it to whatever you want.
Options
The following options are available to you.
Mode
Thee are two animation modes:
1. Bind to Scroll
This is the default animation method. Your animation will be directly bound to page scrolling via scroll bars, a mouse wheel, the keyboard, or swiping. As the page is scrolled, your background will animate.
2. Trigger Animation on Scroll
Instead of being bound, in a one-to-one relationship with page scroll, your animation will be triggered when the target element is scrolled into view. In this manner, you will have an additional option available:
Duration
Set the duration in milliseconds. This is the length of time it will take for an animation to play out fully, from beginning to end. This option, available only for the Trigger on Scroll mode, allows you to set a delay to provide the perception of a lag between scrolling and the animation sequence.
Properties
There are several properties you can use to customize your effects.
Background Size
This property corresponds directly to the CSS background-size property set for your animation. There are three choices:
1. Cover (fill)
The background image will be zoomed to the point where it will fill the entire element it is assigned to.
2. Contain (fit)
The background image will be contained to the inside of the element it is assigned to. It will never be zoomed. If the image is larger than its element, it will be scaled down proportionally, until it fits inside. The behavior is similar to inserting an image into a Harmony column, which will simply scale, based on the size of the column.
3. Natural
The image will behave just like a normal non-repeating background image. The parts of the image that do not fit inside the container will not be seen.
Background Position
This property corresponds directly to the CSS background-position property set for your animation. Think of background position as setting the point of origin (or starting position) for any zooming, scaling, or cropping employed by the background-size property.
Let's say you have a 1920 x 1080 image of a woman's face. Her face, however is all the way on the right side, toward the top. To make sure her face is always in view, you would set a background position of Right Top. Consider the following BSE background effect to illustrate:
Now see what happens if the background position is set to Left Top:
There are nine choices:
- Centered (default)
- Center Top
- Center Bottom
- Left Top
- Left Center
- Left Bottom
- Right Top
- Right Center
- Right Bottom
Animation
Choose the animation method for your effect. There are eleven choices. Of interest, is the None type. As silly as it seems to have this choice in a tool that is designed to animate backgrounds, it does serve a purpose for advanced users who might choose to deploy a composite animation. It also provides a quick way for you to set a background image with advanced CSS properties without having to code it yourself. Here are the eleven choices:
- None
- Zoom In
- Zoom Out
- Slide In From Left
- Slide In From Right
- Slide In From Top
- Slide In From Bottom
- Full Fill - Slide Right
- Full Fill - Slide Left
- Full Fill - Slide Down
- Full Fill - Slide Up
Note: Choices 8-11 are Full Fill types. That is, the system will ensure that throughout their slide, they will be also be zoomed so that they fully fill their container. The zoom applied will correlate with the percentage entered for Animation Range (see below) so it is suggested that images used in this manner are substantially oversized.
Animation Range
A percentage value that sets the range or distance an image moves or zooms. For example:
An instance set to Zoom Out, with a range of 40% means the animation will start 40% larger and end at normal size. A Slide In From Left animation with a range of 40% means that 60% of the image will be positioned out of view, and the remaining 40% will slide in as the animation completes.
Limits
You have the ability to set at what distance from the top of the screen an animation completes as well as the distance from bottom that triggers the animation to begin.
Distance from Window Top when Complete
The animation will complete when the animated element is a set distance from the top of the screen, set as a percentage.
Distance from Window Bottom to Start
This option is only available when an animation is Bound to Scroll.
Run Only Once
The animation will run one time only.
Mask
This can be thought of as the secret sauce that makes Background Scroller Effects especially tasty. The Mask sits between the BSE background image and the content inside the animated element, allowing you to create a transparent window between your content and the background image. The mask can be used to tint the underlying background image or to ensure your content is readable.
Color
You can select from 20 colors (including Transparent) that correspond to the same color choices we provide with the Harmony page layout system, as well as with our most popular menu tools.
Opacity
In addition to setting a Mask Color, you can also set the Mask Opacity—a handy way to control how clearly your background image peeks through the mask.
Styling
The final option allows you to set rounded corners on your BSE instance.
UI Command Buttons
The right edge of the UI contains a set of command buttons.
Create Mode Command Buttons
OK
Build the animation
Remove
Click this button to remove the selected animation. If this is the only animation on your page, the links to the CSS and script files will also be removed.
Cancel
Close the UI without adding an animation to your page.
Help
Open this user guide.
Support Options
Before making a support inquiry, please be certain to have read the documentation that came with your product. Please include your Order Number, Dreamweaver version, as well as your computer operating system type in all support correspondence.
Support Forum
PVII maintains a Web Forum community. Go Direct to the Web Forum
E-Mail and Phone Support
E-Mail: support@projectseven.com
Phone: (336) 374-4611
Phone hours are 9:00am - 5:00pm Eastern Time U.S.