MASKS: Paste Inside Masks
Another type of clipping mask is the Paste Inside mask. Paste Inside works the same way as a regular clipping mask (Modify > Mask > Group as Mask). It is useful for adding material to path or image objects when importing multiple images, and for quickly clipping images to text. You'll clip an image to text in this exercise.
- Choose File > Open
- Browse to the PVII_PhotoMagic directory on your hard drive.
- Locate the sunset_romance.jpg file and click on it to select it.
- Click on Open

Figure1: Romantic beach scene
For the text, I’m going to use a wonderful Art Deco styled font by Nick Curtis, named Drumag Studio NF. If you don't have that one available, use any bold, headline font like Impact, or Bernard MT Compressed.
- Select the Type tool and click near the bottom, left of the canvas.
- Type the name KEY LARGO in upper case characters.
- The text settings I’ve used are Size - 60 Range Kerning - 4 Smooth Anti-Alias Color - #663366.
 .
.
Figure2: The text
To create the mask group,
- Click on the bitmap to select it.
- Choose Edit > Copy. A copy of the bitmap has been placed on the system Clipboard.
- Click on the KEY LARGO text to select it.
- Choose Edit > Paste Inside.
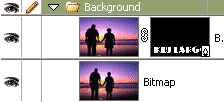
Figure3: The image copy is pasted inside the text
The text is filled with the pasted image, and except for a faint outline, appears to have vanished. You’ll apply a stroke and some Fireworks Live Filters to make the text pop.
- In the Layers panel, click on the thumbnail for the text. The text on the canvas will become highlighted in green.
- Click on the Stroke Fill color box on the PI to open the Swatches popup
- Select the white swatch.
- The Stroke settings are: Width - 2 Stroke type - Basic > Soft Rounded Edge - 40
Now you can see the text. :-) To add the effects,
- In the Layers panel, click on the thumbnail of the photo in the mask group to select it.
- Click on the Add Live Filters button [+] of the Property inspector and choose Adjust Color > Hue/Saturation.
- The Hue/Saturation dialog box opens. The settings are, Colorize - selected (checked), Hue - 322, Saturation - 44, Lightness - 25.
- Click OK to close the Hue/Saturation dialog box.
The Next effect is an Inner Glow.
- Click the Add Live Filters button and choose Shadow and Glow > Inner Glow.
- The Inner Glow settings are: Width - 4, Color - #FFCCFF, Opacity - 45%, Softness - 4
- Click OK to accept the changes and close the Inner Glow dialog box.

Figure4: Colorize, masked text with Stroke and Inner Glow
You'll finish off with two Drop Shadows. To create them, with the Thumbnail of the mask group photo still selected,
- Click on the Add Effect button on the PI and choose Shadow and Glow > Drop Shadow.
The default settings are good, so click on OK to close the Drop Shadow dialog box. For the second shadow, which is used to create an embossed effect,
- Click on the Add Effect button on the PI and choose Shadow and Glow > Drop Shadow.
- The settings for the second Drop Shadow are: Width - 7, Color - #FF99CC, Opacity - 65%, Softness - 4, Angle - 135.

Figure5: Text with upper and lower shadows
Things to try: Drag a black rectangle over the canvas and apply the Color or Saturation Blend mode to create an image reminiscent of a ‘Film Noir’ movie poster.