PVII Gradient Background Animator User Guide
Overview
Gradient Background Animator (GBA) is a Dreamweaver extension that allows you to apply animated gradient backgrounds to any existing page element in just a few seconds... no coding required!
How it Works
Gradient Background Animator (GBA) works by applying your selected color gradient as the background of the selected element.
Linear, Circle, and Ellipse Gradients
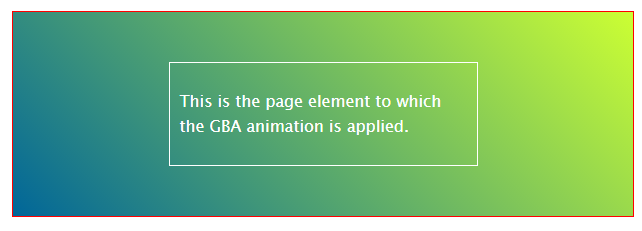
The GBA system applies animation by zooming the background larger than the actual page element and animating the background position with a smooth sliding effect in either the horizontal, diagonal, or vertical directions.
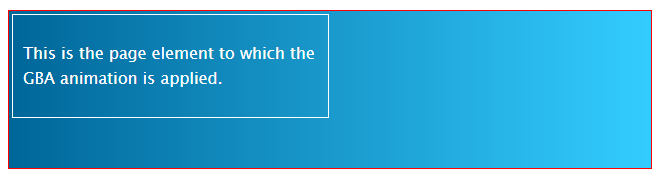
In the above illustration the white bordered box is the page element to which the GBA is applied. The red bordered box is the actual background, and is zoomed up in size according to the Horizontal Zoom and Vertical Zoom settings in the interface. Only the portion of the background that is inside the page element is visible to the user. This zoomed background moves in either horizontal, diagonal, or vertical directions to provide the smooth animated gradient effect.
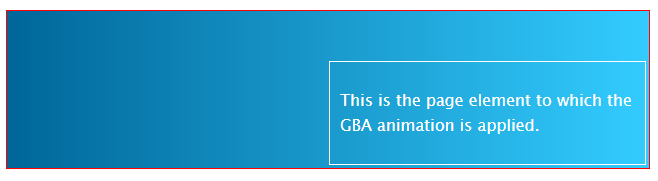
In the above illustration the zoomed background has animated diagonally from top-left to bottom-right, providing a pleasing transition from dark blue to light blue. The GBA interafce includes various options that allow you to control the direction, timing, zooming and other aspects of the animation.
Solid Fill Animation
The Solid Fill animation applies a series of solid colors to the background of the selected element, smoothly transitioning from one color to the next.
Installing the Extension
Extensions are installed using the Adobe Extension Manager (for CS6 and older), or a third party extension manager for CC versions.
Unzip the product file
Unzip your product file before installing.
Save for a rainy day
Save your original product file in logical folders, named and situated where you will be able find them when you need them. A good idea is to create a new folder on your hard drive and name it PVII Extensions. When you download a product file from us, place the zip file in this folder.
Extension File Types:
Extension installer files come in 2 formats: MXP and ZXP.
- MXPs are supported by Extension Manager versions MX, MX2004, 8, CS3, CS4, CS5, CS5.5 and CS6.
- ZXP is supported by versions CS6 and all Creative Cloud version (CC).
To continue to support all Adobe customers, regardless of version, we include both the classic MXP and the new ZXP versions.
To install this product:
- Open your Extension Manager
- Click the Install icon or link
- Browse to where you unzipped the installer file
- Select the extension file (either .zxp or .mxp file format)
- Be sure to re-start Dreamweaver after the extension is installed.
Accessing the Gradient Background Interface (UI)
The Gradient Background Animator user interface is a simple, straightforward layout which will allow you to create and/or modify modern, cutting edge gradient animation effects in seconds.
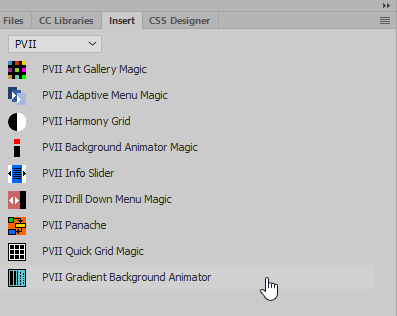
To access the UI, place your cursor on your page where you want to create your Gradient Background animation. To open the interface, locate and click the Gradient Background icon your Insert Bar, or Insert Panel in Dreamweaver:
Insert Bar
Choose the PVII tab (or the PVII category if your insert bar is configured with a drop-down menu)
![]()
The Gradient Background icon is the last one in the screen capture above.
Insert Panel
Choose the PVII category from the drop-down list at the top of your Insert Panel.
The Gradient Background icon is the last one in the screen capture above.
DW Insert Menu
You can always open the user interface using the main Dreamweaver menu:
Choose Insert > Studio VII > Gradient Background Animator by PVII...
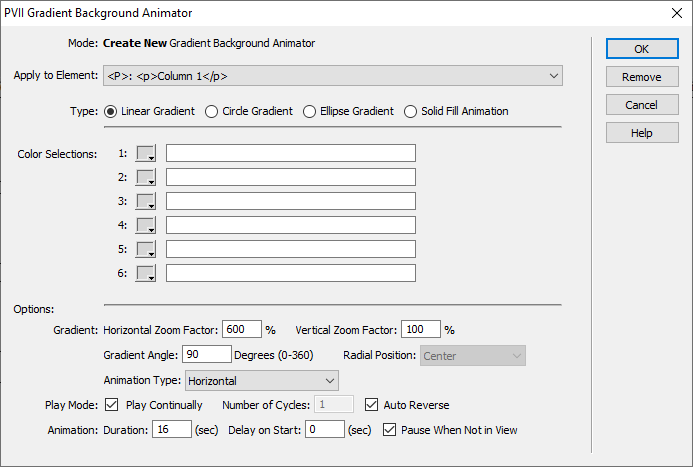
The Gradient Background UI will launch in the appropriate mode. If your cursor was positioned in a blank area of the page, and outside any other Gradient Background instance, the UI will open in Create New Gradient Background mode.
If your cursor is positioned inside an existing Gradient Background instance, you will see an intermediate UI that asks if you'd like to Modify an Existing GBA or Create a Nested GBA.
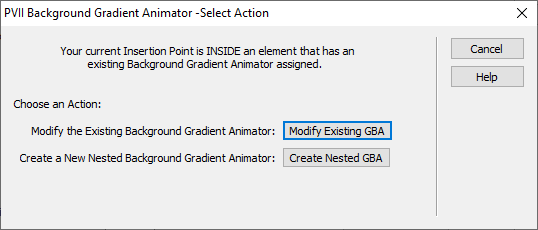
If you choose Create Nested GBA the interface will open in Create Mode.
If you choose Modify Existing GBA the interface will open in Modify Mode:
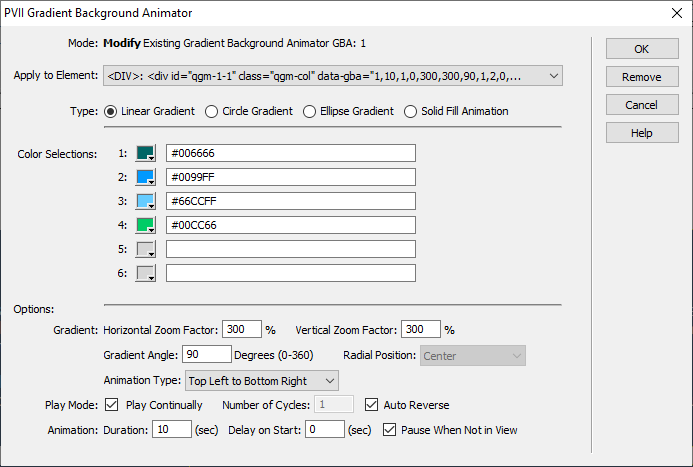
Using the Modify Mode you can make changes to any of the settings and options at any time except the Apply to Element.
Selecting Elements to be Animated
With GBA, you're going to be working with elements that are already on your page... elements such as divs, sections, paragraphs, headings, and paragraphs.
How to Select
Place your cursor inside the element you wish to assign a GBA animation open the GBA interface. Let's say your cursor is inside this paragraph. This paragraph (<p>) will be selected in the Apply to Element selector:

The Apply to Selector will also show all of this paragraph's parent elements, any of which can be selected:
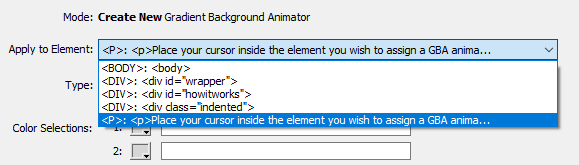
In most cases you would want to apply the GBA effect to the page element that contains the paragraph. Select the 'howitworks' div to apply the GBA effect to it instead of the paragraph:

Each tag up the hierarchy from the paragraph my cursor was inside of, up through the body will be listed. Each element listing contains the first 72 characters of the element's tag, making it easier for you to identify.
Note: The Apply to Element list contains all of the direct parents of the element your cursor was in when you opened the interface. Use this list to make sure you are assigning your GBA animation to the correct element.
Things to Consider
When you plan your animations, there are a few things to keep in mind...
Since GBA animates backgrounds, you need to ensure that the element you are assigning the effect to is tall and/or wide enough to display the background effect properly. The height of an element is, of course, determined by the content inside, but do keep in mind that you can use CSS to assign either top/bottom padding or a min-height to your element to establish a rendered height.
Quick Grid, Harmony and Layout Builder Considerations
If you're a PVII customer, chances are good that you are using our state of the art CSS page layout tools: Quick Grid Magic, Harmony, or Layout Builder. Gradient Background Animator will work perfectly in pages made with any of these tools.
-To animate a background in a Harmony column so that the entire column is filled, choose an hmy-content-wrapper DIV.
- For Quick Grid Magic choose an qgm-col DIV to fill a column (cell), or a p7QGM DIV to fill the entire grid.
- For Layout Builder, choose an lbm-row DIV to fill an entire row, or an lbm-col-wrapper DIV to fill a single column.
Managing the Types and Colors
Type
The GBA system allows you to choose form 4 different gradient animations.
![]()
Linear Gradient
The color gradient transitions along a line axis, the first color appears at the beginning and the last color assigned appears at the end. The line axis can be controlled by setting the Gradient Angle.
In the above illustration the Linear Gradient includes two colors, blue and lime green. The Gradient Angle is set to 45 degrees, starting at bottom left and radiating towards top right.
Circle Gradient
The color gradient begins in a circle shape and radiates outward towards the edges of the container. The first color selected appears as the center circle color, the last color selected appears at the outer edges. The position of the circle can be controlled by setting the Radial Position.
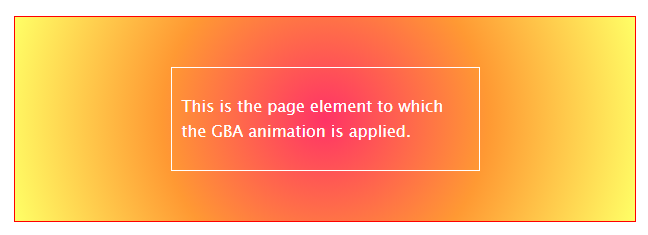
In the above illustration the Radial Gradient includes three colors, starting with a bright red and then radiating outward to orange and finally to yellow. The Radial Position is set to Center.
Ellipse Gradient
The color gradient begins in an ellipse (oval) shape and radiates outward towards the edges of the container. The first color selected appears as the center circle color, the last color selected appears at the outer edges. The position of the ellipse can be controlled by setting the Radial Position.
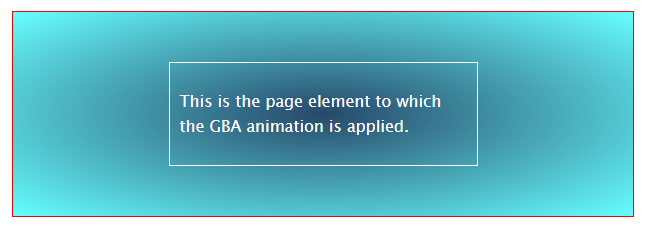
In the above illustration the Ellipse Gradient includes two colors, starting with a dark blue and then radiating outward to cyan. The Radial Position is set to Center.
Solid Fill Animation
The Solid Fill acts much like a normal background color, filling the entire element background with the color. The first color selected appears at the start of the animation. The color then smoothly transitions to the next color(s) selected, and ends with the last color selected.
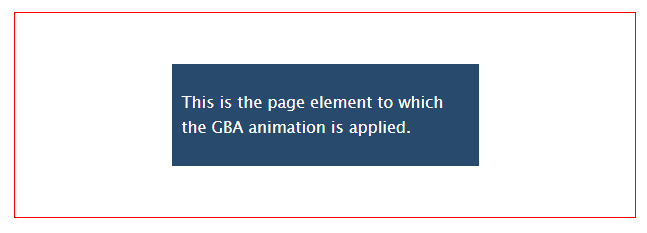
In the above illustration the page element is assigned the starting background color. There is no zooming or moving of the background. The color will smoothly transition through the series of colors selected, ending with the last color selected.
Color Selections
The GBA interface allows you to choose up to six colors for your animation. The animation will run in the order of this list.
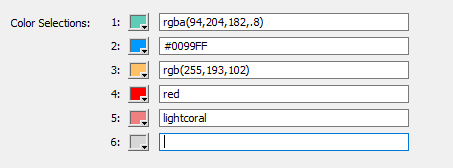
For each color you can use the handy color picker or enter your desired color code into the box. The format for the colors can be hex, rgb, rgba, or color names. You can edit, add or remove these colors at any time.
Options
Set the options in this section to control the operation and rendering of the animation.
Gradient
This set of options control how the animation will look and work. These options are not available for the Solid Fill animation.

Horizontal Zoom Factor
Set the amount of zoom for the background in the horizontal direction in percent. The amount of zoom should roughly be a multiple of the number of colors you are using. For example, if you have three colors then a minimum of 300% is recommended. You can use much larger zoom factors to stretch out the animation.
Vertical Zoom Factor
Set the amount of zoom for the background in the vertical direction in percent. The amount of zoom should roughly be a multiple of the number of colors you are using. For example, if you have three colors then a minimum of 300% is recommended. You can use much larger zoom factors to stretch out the animation.
Gradient Angle
The Gradient Angle setting is available only for the Linear Gradient animation type. This sets the line angle of the gradient; 90 degrees being vertical, 45 degrees starting at bottom left and radiating towards top right. Any value between 0 and 360 is accepted.
Radial Position
The Radial Position setting is only available for the Circle and Ellipse animations. This allows you to set the starting position of the circle or ellipse, choose from:
- Center
- Top Left
- Top Center
- Top Right
- Right Center
- Bottom Right
- Bottom Center
- Bottom Left
- Left Center
Animation Type
Choose the direction of the animation:
- Horizontal
- Vertical
- Top Left to Bottom Right
- Bottom Left to Top Right
Play Mode
This set of options control the opration of the animation.
![]()
Play Continually
This option will repeat the animation infinitely.
Number of Cycles
When Play Continually is unchecked this box becomes enabled. Enter the number of animation cycles you wish to run. The animation will stop once the number of cycles has been reached.
Auto Reverse
The animation will automatically reverse its direction when each cycle is reached rather than re-starting form the beginning position.
Animation
This set of options control the timing of the animation.
![]()
Duration
Set the number of seconds the animation takes for each cycle. This setting, in conjunction with the Zoom Factor settings, will determine how fast the animation moves. The higher the Zoom Factors the slower the speed (more distance to travel) and the higher the Duration the slower the speed (more time).
Delay on Start
The GBA animations will start on page load for any GBA element that is in view. You can delay the start of the animation by entering the delay amount in seconds.
Pause When Not in View
This feature saves browser resources and is enabled by default. The GBA animations will only run when the page element to which they are assigned are currently in view.
Control Actions
We included a convenient suite of Control Actions, which might be useful to you.
Before accessing the GBA Control Actions interface, create a null link or an image link on which to assign your actions(s). A null link might look like this:
<a href="#">Pause Animation</a>
To access the Control Actions interface, click on the link and open the Behaviors panel (Window > Behaviors).
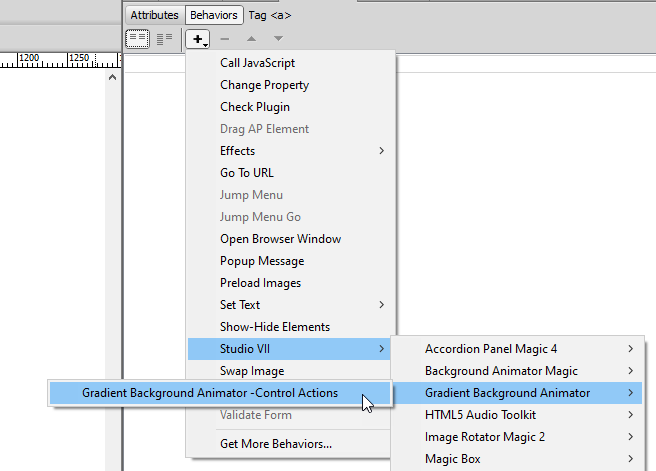
- Click the + symbol and choose:
Studio VII > Gradient Background Animator > Gradient Background Animator - Control Actions
The Control Actions dialog will open:
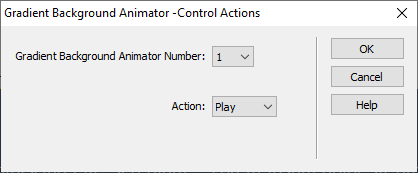
- Select the relevant GBA instance from the Gradient Background Animator Number drop-down list.
- Select a Control Action from the Action drop-down list:
- Play
- Pause
- Click OK.
The link you created earlier will now look like this:
<a href="#" onClick="P7_GBActrl(1,'pause')">Pause Animation</a>
- To finish your task, and to prevent the page from jumping when the null link is clicked, add a return false:
<a href="#" onClick="P7_GBActrl(1,'pause'); return false;">Pause Animation</a>
© Copyright 2021-2022 Project Seven Development. All Rights Reserved.