

Drill Down Menu is modern, responsive menu that you can manage from inside a special interface that runs inside Dreamweaver.
A drill down menu is a multilevel menu system whose levels present in the same space, each one replacing another as called. In this way, it makes more efficient use of vertical space than a tree-style or accordion-style menu. Because of the way we have structured and designed the menu, its operation is extremely intuitive.
Drill Down Menu (DDM) is a PVII Menu Builder: a product that installs into Dreamweaver, giving you a visual and automated means to create fully-styled menus with a just a few clicks. The DDM user interface allows you to easily set up and configure your menu. Once created, you can manage the menu at any time by reopening the user interface, where you can add, remove, or reorder items. You can also create and manage as many menu levels as you need.
Your menu can exist in a server-side or PHP include, or you can use it in conjunction with Dreamweaver's built-in Template features. The choice is yours.
Every project is different. At PVII, it's all about giving you options. If you, or your client would rather an accordion-style sub-menu presentation, Slide Out Menu Builder should be considered. If you'd rather a more traditional menu, with drop-downs and fly-outs, then Adaptive Menu Magic (AMM) might be what you need.
Unzip your product file before installing.
Save your original product file in logical folders, named and situated where you will be able find them when you need them. A good idea is to create a new folder on your hard drive and name it PVII Extensions. When you download a product file from us, place the zip file in this folder.
Extension installer files come in 2 formats: MXP and ZXP. MXPs are supported by Extension Manager versions MX, MX2004, 8, CS3, CS4, CS5, CS5.5 and CS6. ZXP is supported by versions CS5.5 and higher. CC (Creative Cloud) versions have dropped support for the MXP format. To continue to support all Adobe customers, regardless of version, we include both the classic MXP and the new ZXP versions.
As of CC 2015, Adobe has ceased to support its own Extension Manager. Use the PVII Extension Manager for Adobe Creative Cloud.
We regularly issue updates to address emerging browser issues, bugs, and also to add or enhance features. Critical updates are announced via email. For scheduled updates, please check our home page regularly for a listing of updates, or go straight to our updates page. Compare the version number of the update to the version number of your installed product. Versions are included in the product file name, as well as in your Dreamweaver Extension Manager. For instance, a product file named p7_DDM_110.zip indicates version 1.1.0.
You can create a DDM menu on a standard page, in a Dreamweaver DWT file, or on a page based on a Dreamweaver Template.
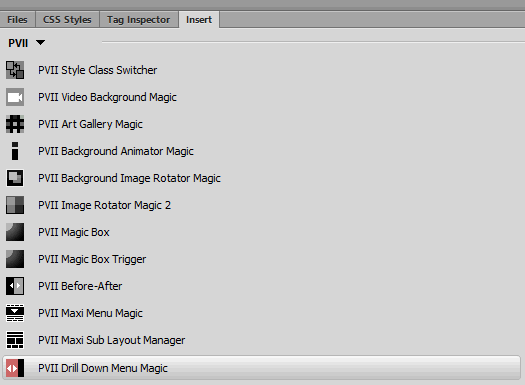
If your Dreamweaver workspace includes a classic Insert Bar, switch to the PVII category and click the PVII Drill Down Menu icon.

You can also access the icon if you are using the default Dreamweaver Insert Panel:
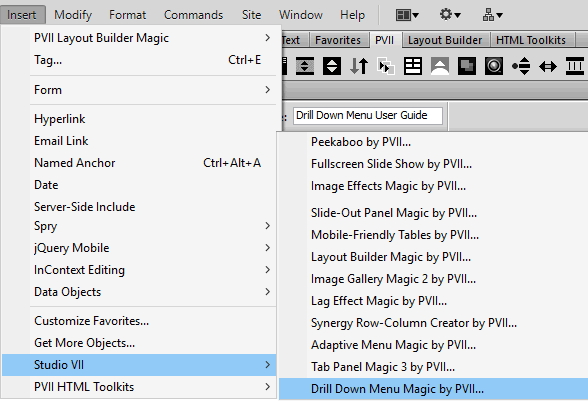
Alternatively, you can open the interface by choosing Insert > Studio VII > Drill Down Menu Magic by PVII
The Interface will open.
If you opt to use the Fixed Slide Out mode, there is no need to position your cursor at a specific insertion point. Essentially, you can click anywhere within the body. The menu markup will appear at the end of your page source code (or, if inserting on a template-child page, at the bottom of your editable region). Alternatively, if you choose Embed at Insertion Point, you must first place your cursor on the page where you want your menu to be created.
When you open the DDM UI for the first time, it will open in Create Mode, with one root menu item in the Menu Items list. All options will be set to their default values.
We place no restrictions on the number of Drill Down Menus you can create.
When the interface opens, you are ready to configure your menu.
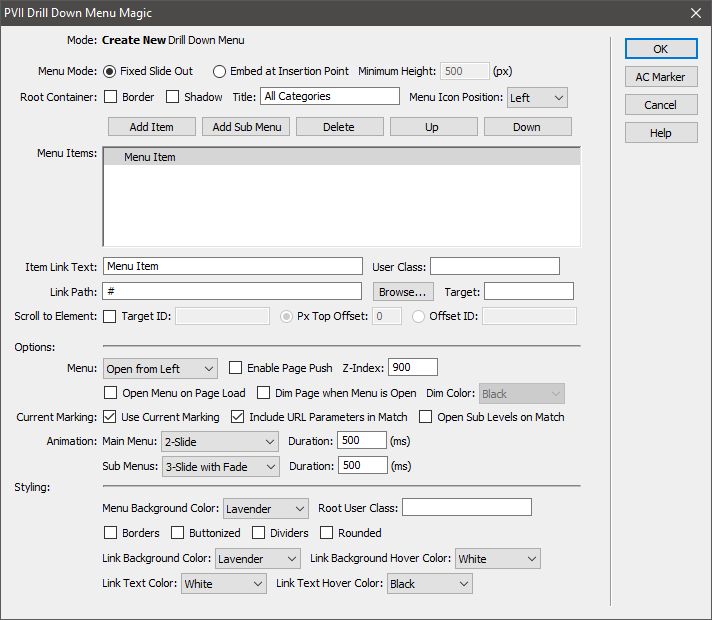
The first row of options relate to the Menu Mode: Fixed Slide Out or Embed at Insertion Point. Once a menu is created, the mode cannot be changed. In fact, the Mode options will be grayed out (inaccessible).
Fixed Slide Out will create a menu that looks at behaves like the one on this page. A Hamburger icon will be generated that, when clicked (or tapped) causes the menu to slide out from either the left or right edge of the browser window. The menu is full width, and its position is fixed. That is, it remains where it is as the page is scrolled.
Embed at Insertion Point will create a menu at your cursor insertion point. The menu can be placed anywhere on your page and will always be visible. When you create an embedded DDM menu, a Minimum Height of 500px is assigned. A min-height is required to ensure that menu levels are properly hidden. Adjust this option based on the structure of your menu, while noting that if your menu items are longer than the min-width, a scroll bar will be generated.
Should you create a menu and later decide to change its mode, simply create a new menu where you want it, then copy the links from the old one to the new one. You can do this by copying the root UL, then pasting it to replace the root UL in the new menu. If you don't feel confident doing that, simply delete your old menu (using the Remove button in the DDM UI) and create your links from scratch.
The second row of options is for the Root Container. You can optionally set a border, a shadow, and the main Title for your menu. This is also where you set whether to display the menu's Hamburger icon on the left or right side of you page.
Use the Command buttons above the Menu Items list to add menu items and sub-menus.
Additional options, including styling options, will be discussed below in the Managing a Drill Down Menu section.
To manage an existing menu, scroll to the bottom of your page in Dreamweaver, then place your cursor anywhere inside your menu. Open the UI, using the Insert Bar, Insert Panel, or Insert Menu (just as you did when you first created your menu). The system will detect that your cursor is inside an existing menu and will open the UI in Modify Mode.
Nothing could be easier. You can edit your menu at any time. Simply follow the instructions at left (or above on a small screen) to open the UI. When the UI opens, you will be in Modify Mode and your menu items will be listed.
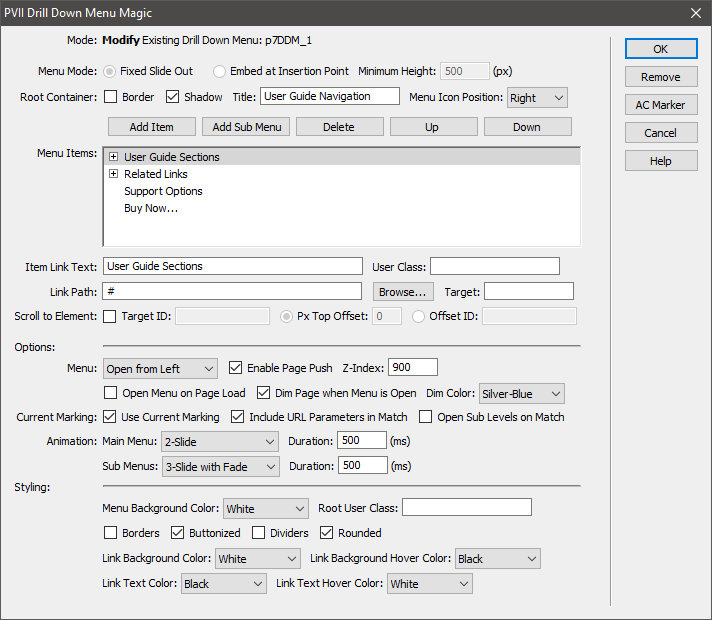
Set an optional Border or Shadow. The effects will be assigned to the right edge if your menu opens from the left or to the left edge if your menu opens from the right.
Set an optional menu Title. The Title will appear as a heading when your menu is showing its root level. When a sub-menu is selected, its name will replace the title.
Set the Menu Icon (hamburger) Position to Left or Right.
Use these buttons to build and manage your menu items. You can Add Items, Add Sub Menus, Delete items, or move them Up or Down. Clicking a button affects the item you have selected in the list.
Set the text for your links.
Set a custom user class for any of your links (enter the name only. Do not add a leading period). You can also add multiple classes. Simply separate each class name with a space.
Type in or use the browse button to enter the path to the linked page. When a menu item is also a trigger that opens a sub-menu, you should always leave the Link Path set to a null hash (#).
Use this option if you want the link page to open in a new tab (or window). We recommend using a name such as new-window, which will reuse the same tab or window, rather than opening multiple tabs or windows.
Drill Down Menu offers smooth scrolling to same-page links!
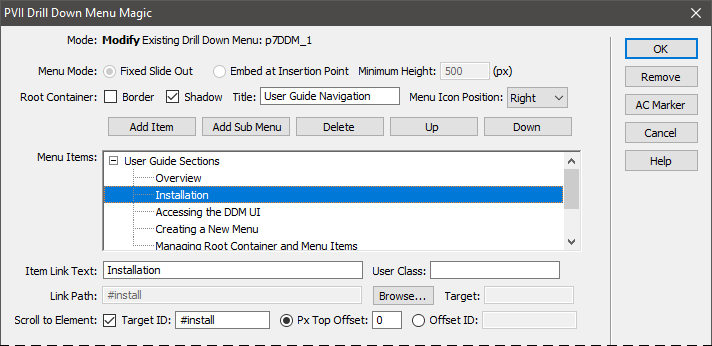
Drill Down Menu comes with with scroll to element functionality for smooth-scrolling same-page links. To use this feature, first assign an ID to a heading or DIV on your page. Example:
<h2 id="install">Installation and Updates</h2>
Enable the Scroll to Element option by checking its box.
Enter the ID of the target element, in this case install.
Note that you can include a leading hash (#) or not. The system will add it automatically.
Optionally set a Top Offset in pixels if you want to scroll slightly past the target.
Enter an Offset ID if you want. An example would be if you had a fixed header bar across the top of the page and you need your target element to clear it. In that case, assign an ID to your header and enter it into the Offset ID box.
It might not be apparent, but if you opt to dim your page when the menu is open, experiment with setting a Dim Color. The effect can be very nice! Another easy to miss, but useful option is to Open Sub Levels on Match, which works in concert with the auto current marker.

Choose whether your menu Opens from Left or the Right.
Enable Page Push if you would like your page to be nudged over to the left or right to make room for your menu.
The default Z-Index is 900. Increase or decrease the value to deal with stacking order issues with other elements on your page.
Enable Open Menu on Page Load if you want your menu to open when your page loads.
Dim Page when Menu is Open dims your page (makes it semi-transparent under a colored overlay) when the menu is open.
Dim Color. Choose an overlay color when your page is dimmed. This option can provide some real visual interest.
Current Marking. Highlights the link in your menu that matches the loaded page. We recommend leaving this option enabled, as well as the Include URL Parameters in Match option.
Open Sub Levels on Match. This option is driven by the Current Marking option, and it does just what it says. When a link in one of your sub-levels matches the current page address, that menu will be expanded and in view when you open the menu.
Animation. Choose an animation method for both the main menu as well as the sub-menus. You can also set the animation Duration. Increase the default value of 500 to slow the animation. Decrease the value to speed things up.
Drill Down menu colors can be set in the UI, from a palette of colors that are compatible with PVII page layout systems and menu systems. You can also set borders, rounded corners, and link dividers.
Styling options apply to all menu items (links) in your menu.

Set Menu Background Color for the entire menu.
Set a Root User Class. This can be used as a hook for advanced CSS authors to create their own custom descendant selectors.
Enable Borders around sub-menus.
Enable the Buttonized option to make all your menu items render as styled boxes. This option will also set an appropriate amount of vertical spacing between menu items.
Set vertical Dividers between sub-menu items.
Set Rounded corners around sub-menus.
Set a Link Background Color for all menu items.
Set a Link Text Color for all menu items.
Set a Link Background Hover Color for all menu items.
Set a Link Text Hover Color for all menu items.
Note: The menu section headings, back links, close button, and back to top level button will be appropriately colored and styled to stand apart from menu items.
Open the Advanced Current Marker UI by clicking the AC Marker command button.
The None option allows you to completely turn off all current marking for this menu on this page only. This is a special override that allows you to have the menu working with current marking turned off on a specific page while it is enabled on other pages.
The Link Text option allows you to select the text of any one of the existing links in your menu as the target for the current marker. When the page loads, the system will look for this text in the menu markup. If a match is found it will apply the current marker style class to the menu link.
This feature should only be used on pages that are NOT linked in the menu. The Advanced Current Marker is designed to address current marking only for those pages that are not represented in the menu. If the page does have a corresponding link in the menu then that link will be used by the default current marker instead.
The URL Match option allows you to select the link value (the href) of any one of the existing links in the system as the target for the current marker. When the page loads, the system will look for this link value in the menu markup. If a match is found it will apply the current marker style class to the menu link.
The simplest and most direct method for Advanced Current Marking is to use the Text Option. However, there may be occasions where you have duplicate text values in the menu. In these cases, you can use the URL match option to target a specific link for current marking.
This feature should only be used on pages that are NOT linked in the menu. The Advanced Current Marker is designed to address current marking only for those pages that are not represented in the menu. If the page does have a corresponding link in the menu then that link will be used by the default current marker instead.
The Folder:Text Match option is designed to allow you to handle large numbers of current marker exceptions and is typically used as a global option applied to every page. Use this option when you have a large number of pages that are not represented in the menu.
This option allows you to specify a series of folder names and link text values that the system will use for determining the current marked link in the menu. For example, you can specify that any page which contains the folder "support" in its URL will be matched to specific link text "Information". This is referred to as a Folder Name :: Link Text pair.
You can specify as many of these Folder Name :: Link Text pairs as you like. The system will test each pair until it finds a match. If a match is found it will apply the current marker style class to the menu link to provide the "you are here trail" in the menu. You can use this system to automatically handle current marking for all of your site's pages without having to edit any of them individually.
This feature should only be used on pages that are NOT linked in the menu. The Advanced Current Marker is designed to address current marking only for those pages that are not represented in the menu. If the page does have a corresponding link in the menu then that link will be used by the default Current Marker instead.
The DDM UI contains a column of command buttons along its right edge. Three of the buttons are pretty typical and require little explanation: OK, Cancel, and Help. If you are working on an existing menu, an additional button will appear: Remove. There is also another called AC Marker.
The following buttons are available along the right edge of the UI:
Click this button to execute the changes made during your session in the UI.
Open the Advanced Current Marker utility, which you can use to enhance the behavior of the automatic current marker.
Dismiss the UI. No changes will be made to your page
In the Modify Mode UI, an additional button will appear:
Remove the entire menu. If this is your only menu on the page, linked CSS and script files will also be removed.
Styling notes to go here.
Before making a support inquiry, please be certain to have read the documentation that came with your product. Please include your Order Number, Dreamweaver version, as well as your computer operating system type in all support correspondence.
PVII maintains a Web Forum community. Go Direct to the Web Forum
E-Mail: support@projectseven.com
Phone: (336) 374-4611
Phone hours are 9:00am - 5:00pm Eastern Time U.S.