Buy Now ($35: Includes PVII DT CSS and PVII Server Side Includes)
Server Side Includes for DreamweaverPVII is the leader in creative extensions for Dreamweaver
PVII Server Side Includes can be installed in Dreamweaver versions CS5.5 to CC 2015 (and later).Server-Side Includes allow you to manage repeating sections of your web pages in a central file. This page will help you to deploy your server side include.
How Server-Side Includes work
The technology is wonderfully simple. You place a directive in your page where you want the contents of an external file (the include file) to be inserted. When your server encounters the directive, it reads the external include file and inserts its contents in place of the directive. Includes are often more practical to use for medium-to-large sites because only the include file needs to be edited and uploaded to your server. Each page that contains a directive that references the include file is then updated instantly.
Server Side Includes are easy to master and can easily replace the need to use Dreamweaver Templates (DWT).
Using SSI
To adapt your site to use SSI, you first need to make sure your server is set up to parse include files. If you do not know how to do this, contact your hosting company or server adminstrator. Tell them you need for ordinary .HTM and .HTML pages to parse server side includes. It is extremely easy to do on Unix, via your site's htaccess file.
Windows hosts should also be able to set this up for you in a few minutes. If you manage your a dedicated server (Windows or Unix) please see this addendum.
What goes in an include file
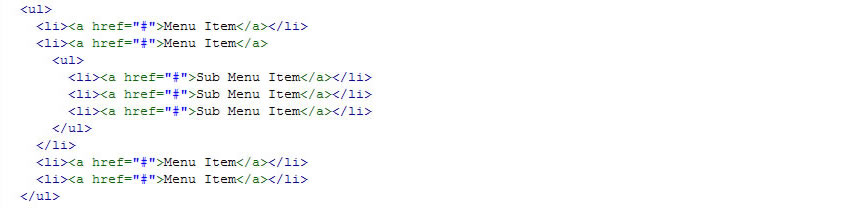
For an include to work, the include file must contain only the code you wish to be inserted into your page. If your include will consist of a PMM3 menu, for example, it should contain only the menu markup. In Code View, it might should look like this:
<ul class="menu-bar">

  <li><a href="#">Menu Item</a></li>

  <li><a href="#">Menu Item</a>

  <ul>

  <li><a href="#">Sub Menu Item</a></li>

  <li><a href="#">Sub Menu Item</a></li>

  <li><a href="#">Sub Menu Item</a></li>

  </ul>

  </li>

  <li><a href="#">Menu Item</a></li>

  <li><a href="#">Menu Item</a></li>

  </ul>
Where do the html, head, and body tags go? And what about if there are linked JavaScript and CSS linked files? They go in your actual pages as will be explained in the steps below.
Setting Dreamweaver to show Includes in Design View
Dreamweaver can be set to display server-side includes in Design View.
-Choose Edit > Preferences
-Switch to the Invisible Elements category
-Place a Check in the box between Server-Side Includes: and Show contents of included file
-Click OK
Creating the Include file
The include file is the external file that contains the information that you wish to include in your actual web pages. You'll create a new folder, an include file inside that folder, and then you'll copy the menu markup from an existing web page and copy it into the new include file.
-Create a new folder inside the root of your defined Dreamweaver site.
-Name the new folder includes.
-Create a new file within the includes folder and name it menu_include.htm.
-Open the page that contains your actual menu. For this tutorial, we'll assume that this page is index.htm.
Changing the file extension to shtm
For your include to work on your server, you'll need to change your file extension so that index.htm becomes index.shtm.
-Open index.htm (the page that contains your menu).
-Choose File > Save As.
-For File name, type in index.shtm.
-Click Save.
Note: The file extension depends on your server capabilities and could be .shtm, .shtml, .php, .asp, .aspx, or .cfm.
Copying the menu markup
-In index.shtm, switch to Code View
-Find the menu markup and copy it.

-Select it
-Choose Edit > Copy
-Open menu_include.htm
-Switch to Code View
Include files must only contain the code you wish to appear in your actual web page. Your page already contains a DOCTYPE, an <html> tag, a <head> region and a <body> tag. You will remove all of this code and replace it with the menu markup you copied from your actual page.
-Select all of the code in your menu_include.htm file
-Delete it so that your page code is completely blank
-Press CTRL + V to paste in your menu markup
Your menu markup replaces the original page code.
Converting links to site root relative
When viewed on the internet, your server will insert the contents of your include file into your actual web pages. In all likelihood, your pages will reside in various folders within your site. If you use Document Relative paths (Dreamweaver's default), then your menu item links will always be relative to your include file, which is in its own folder. Your links will not work unless the page happens to reside in the includes folder. The only way to ensure that your links are always going to work, no matter what the page, you must set them to be relative to the root of your site.
-In menu_include.htm, Select a menu item.
-Click the Browse... button.
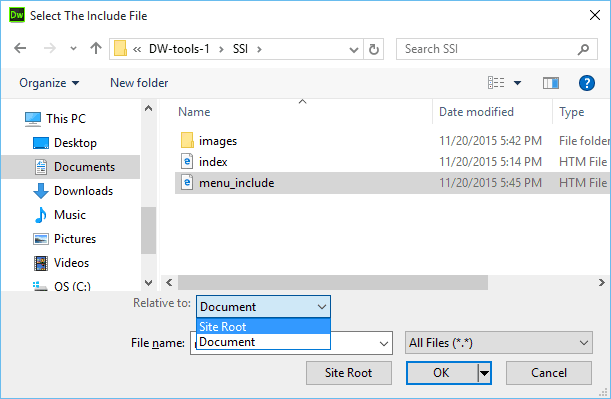
-The Select File To Link dialog will open.
-Browse to the file within your defined site that you wish to link to and select it
-In the Relative to list, choose Site Root.
The URL value will change to include a leading forward slash, which indicates the path to your linked file is now relative to the root of your site.
-Click OK to close the Select File To Link dialog.
-Repeat the above steps to change all of the links in your menu to site root relative.
-Save the include file.
Inserting the Include
-Switch back to index.shtm.
If your menu markup is not still selected, go ahead and select it again-
-Press your Delete key to delete the markup.
-choose Tools > Commands > Server Side Includes
The Insert Server Side Include dialog will open.
Select Virtual or File
-Click the Browse icon to browse to your include file.
-Select your file.
-If you need to use a Vrtual include for Microsoft servers, make sure you select a site root relative path.
Note: Even if using SSI on a Unix server, site root relative paths are usually the better choice.
-Click OK.
-Dreamweaver will insert an Include comment in your code.
<!--#include file="/includes/pmm3_include.htm" -->
About Virtual Includes
Virtual Includes are always used with Site Root Relative paths. If you forgot to choose Site Root in the Select File dialog, you can correct this-
-Place your cursor anywhere inside the Include comment
Your Property Inspector will change to show options for your Include
Note: If you do not see the above Properties inspector view, you will see a Refresh button. Click it to refresh Code View.
-Select the Virtual Type radio button. Dreameaver will ajust the path for you.
Previewing locally
In Dreamweaver you can preview pages that contain includes and Dreamweaver will display the included content using a special temporary file. To see the included content, Dreamweaver must be set up to Preview using a temporary file. To make sure this feature is enabled-
-Choose Edit > Preferences.
-In the Preview in Browser category, check the Options box to Preview using temporary file.
-Click OK.
Note: Dreamweaver can only generate the included content for the current page. If you click a link on the previewed page and open another page, the include will not be rendered. This is normal behavior for Dreamweaver. All pages will work as expected on the internet.
Parsing htm and html file types
The following addenda cover customized settings to enable parsing of htm and html file types. The first addendum covers Windows Server and the second addendum covers Linux/Apache/Red Hat servers.
Addendum: Parsing on IIS (Windows Server)
Note: Even if you manage your own server, your hosting company or server admin should be able to set this up for you.
When page content is called via SSI directive tags in HTML pages, the server has to parse (look through) these pages trying to find SSI directives.
In the past, when servers were running on 386 and 486 machines, this often bogged down a server by forcing it to parse every HTML file it serves up looking for SSI directives. Modern servers should not be affected at all. Web servers typically only look through certain HTML files. These files are identified by their extensions.
By default, IIS will only parse HTML files that have .shtm, .shtml, and .stm extensions.
This can pose a problem if you want to start adding SSI directive tags to long-established pages. These pages may have the more traditional extensions of .htm and .html and through time could be linked to by numerous other sites and indexed with their current extensions by various search engines. Changing the extensions to accommodate server parsing would cause a raft of 404 errors when people try to access these pages from existing links and search engine references.
Apache users can get around the above problem by using a .htaccess file. You don't even have to be a server admin to set one up. However, with IIS you do have to be a server admin, or at least an IIS admin, to get around the above problem. Let's say you want IIS to also parse all pages that have a .htm extension. Here's how:
- Right-click on the selected Web site and select Properties
- Click on the Home Directory tab
- Click on the Configuration button
Scroll to the bottom of the list in the App Mappings tab and you'll see the HTML file extensions listed for pages that are parsed by default
Highlight the entry for the .shtml extension and click on the Edit button and note the mapping properties
Click on the Cancel button to close this window and click on the Add button to create a new mapping
Simply duplicate the mapping properties you noted in the previous step but this time enter .htm in the Extension field and click on OK.
The default file extension for CGI scripts under IIS is .pl so if you have a bunch of CGI scripts with a .cgi extension, you can use the above procedure to add a mapping to the Perl.exe file for the .cgi extension. Simply duplicate the mapping for the .pl extension.
That's all there is to it. It's probably a good idea to restart the server, or at least the IIS service in the Control Panel, so that all your changes take effect.
Linux/Apache/Red Hat Parsing
If you have access to your server or to your web directory's htaccess file, you can leave your web pages as index.htm or page.html and have your includes parsed just as if they were placed in an index.php or page.php file!
Edit the .htaccess file
Go to your WWW root and look for the file named .htaccess. If it's not there ask your host or server administrator where to find it and if you may edit it.
Ask your host for the line to add in your .htaccess file. It will look something like:
RemoveHandler .html .htm
AddType application/x-httpd-php .php .htm .html
or simply:
AddType x-mapp-php4 .html .htm
or perhaps:
AddType x-mapp-php5 .html .htm
Once you have the correct method to deploy from your host, save the file and upload it to the root of your site.
Save and close the .htaccess file. Upload it to your web server and you're done.